Incidents
An incident is an alert you send to a group of recipients through one or more communication channels. You can create one manually at any time, or trigger one automatically through a Scenario.
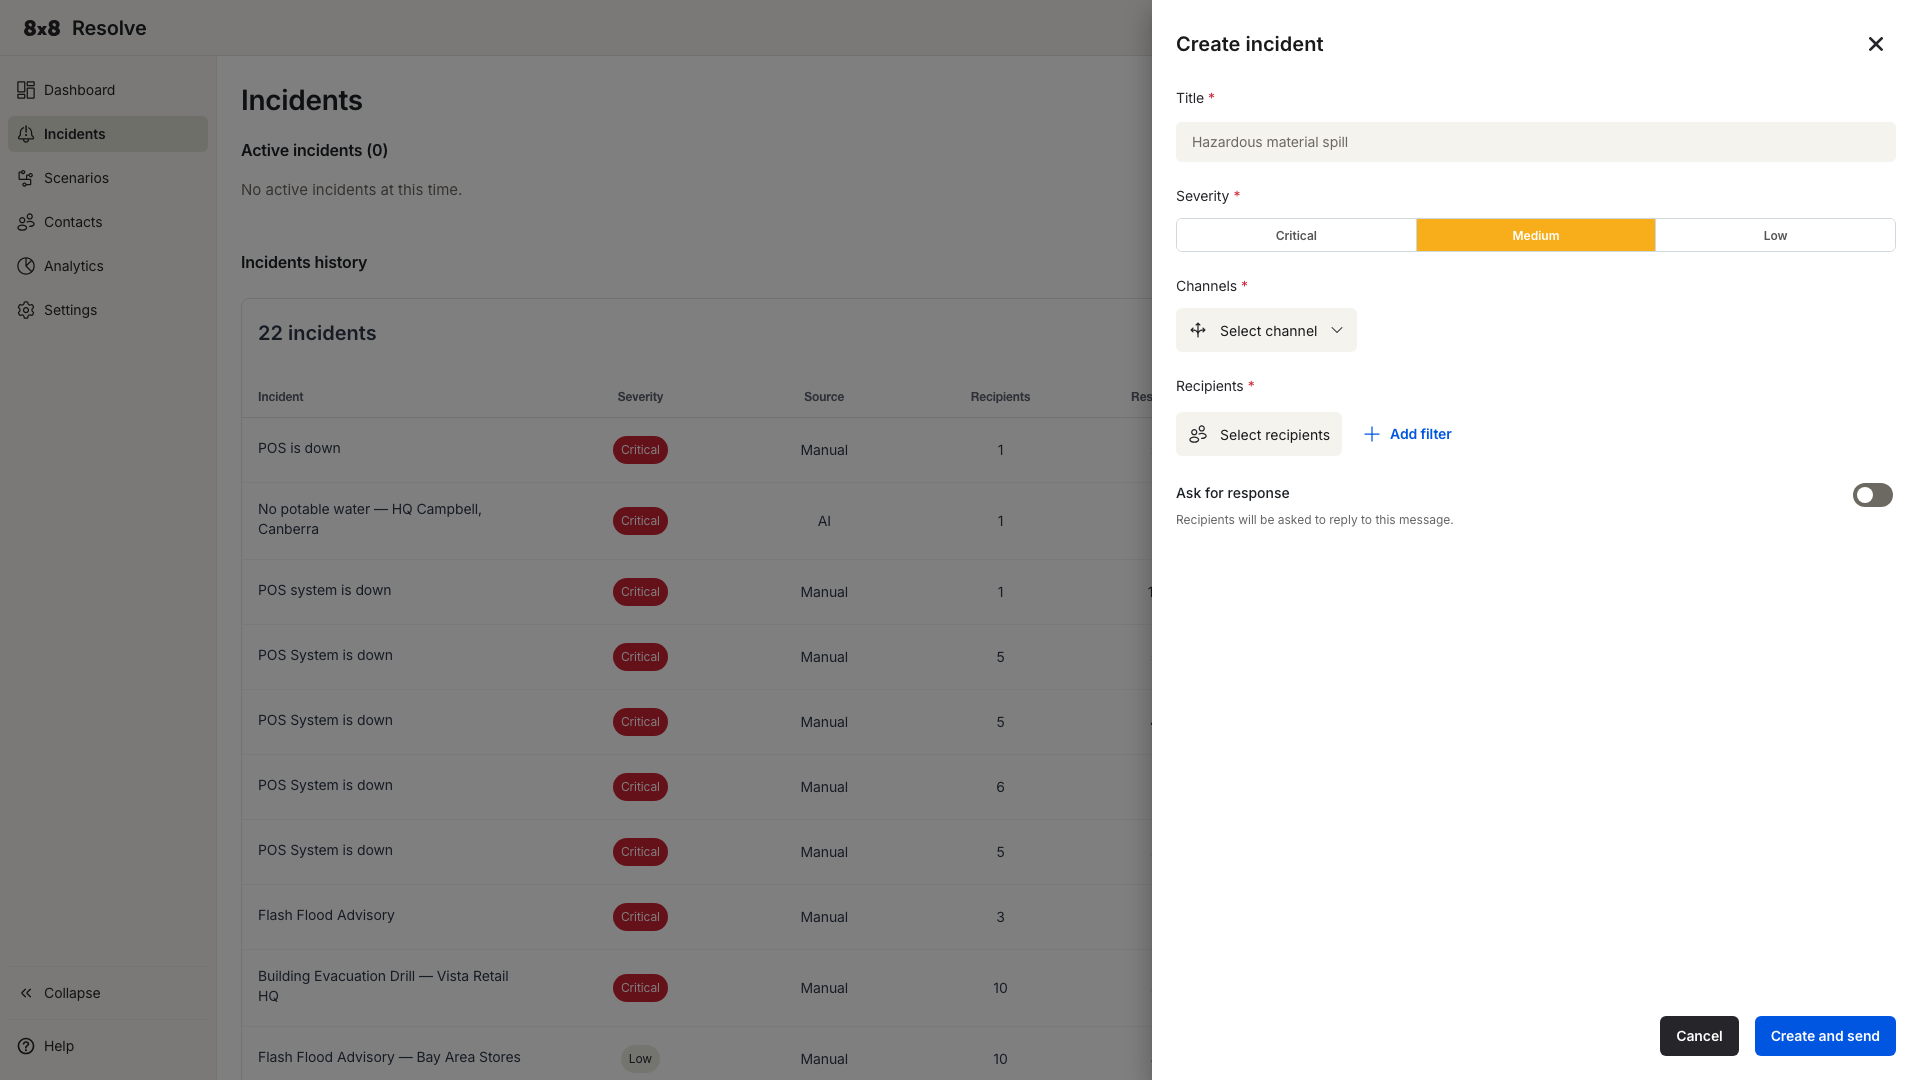
Create an incident
-
Click + Create Incident in the navigation bar. The Create Incident panel opens on the right.
-
Fill in the incident details:
Field Description Title A short name or summary of the incident (e.g., "Incidents test"). Severity The incident's impact level — Critical (red), Medium (amber), or Low. This drives the visual indicators in the incident list. Channels A multi-select of delivery channels — pick any combination (see Delivery channels). Selected channels appear as tags inline in the field. Template A predefined message template. The message body auto-populates below the selector and is editable before sending; it supports variables such as {{firstName}}. Use the ✕ button to reset the selection.WhatsApp Template A separate WhatsApp-specific template (used when WhatsApp is a selected channel), with an inline preview of the formatted message and any template buttons. Clear it with the ✕ button. Recipients Click Select recipients (the button shows a live count) to choose who receives the alert. See Target specific recipients. Ask for response Optional toggle to collect replies from recipients. See Ask for response. -
Click Create and Send to dispatch the alert immediately, or Cancel to discard it.
📘 Required fields
Title, Channels, and a Template are required. If you click Create and Send without filling them in, each empty field shows a red border and a "Field is required" message.
Delivery channels
You can send an incident over any combination of these channels:
| Channel | How it reaches the recipient |
|---|---|
| 8x8 Work Desktop | Notification in the 8x8 Work desktop app. |
| 8x8 Work Mobile Notification | High-priority push notification via the 8x8 Work / Resolve mobile app, delivered even when the app is in the background or the screen is locked. |
| Email to their address. | |
| SMS | Text message to their mobile number. |
| Voice | Automated voice call to their phone. |
| Message to their WhatsApp number, sent using the selected WhatsApp Template. |
Selected channels are shown as tags inline within the Channels field; you can pick all of them or any individual combination.
Target specific recipients
Use the Recipients section to send the incident to a subset of your contacts. Filter by:
- Department (e.g., Finance)
- Location (e.g., New York Office)
- Role (e.g., Supervisor)
Click Add filter to combine multiple criteria. The incident goes only to recipients who match all of the filters you've applied.
Ask for response
Enable the Ask for response toggle to prompt recipients to reply to the incident. When it's on, three settings appear:
Response type — what kind of reply you're collecting:
| Type | Behaviour |
|---|---|
| Standard | Pre-set, read-only options: I acknowledge and I need help. |
| Custom poll | Define your own options — up to five label/keyword pairs. Add them with + Add option, delete any individually, and use Preview to check how they'll look. |
Method — how recipients submit their response:
| Method | How recipients respond |
|---|---|
| Web link | Recipients respond via a web-based link. |
| Keyword reply | Recipients respond by replying with the defined keyword (for example, over SMS). |
Response options displays the configured choices — the read-only I acknowledge / I need help for Standard, or your label/keyword pairs for a Custom poll.
You can track response rates in real time from the incident details page and the dashboard.
Recipient response experience
When Ask for response is enabled, what the recipient sees depends on the Method chosen.
Web link
The recipient receives a unique URL through their delivery channel. Opening it loads a hosted response page.
Page layout:
- Header bar (dark, full-width) — 8x8 Resolve brand mark.
- Response card (centred) — contains:
| Element | Description |
|---|---|
| Severity pill | Coloured pill showing severity in uppercase (e.g., CRITICAL in red, MEDIUM in amber). |
| Relative timestamp | Time since the incident was sent (e.g., "0 minutes ago"). Updates as time passes. |
| Incident title | Bold heading from the Create Incident panel. |
| Message body | The sent message with template variables resolved. |
| Response buttons | One full-width button per configured option (see below). |
Standard response type — two buttons:
- Acknowledge (blue, checkmark icon) — records an I acknowledge response.
- I need help (red, warning icon) — records an I need help response.
The buttons are mutually exclusive. Each recipient's URL is unique and tied to their identity — no login required. Responses feed into the incident's response tracking and are used by Condition nodes in scenarios.
Custom poll — one full-width button per configured option, in the order defined in the Create Incident panel.
Keyword reply
The incident is delivered as plain text. The original message body is followed by one instruction line per configured response option:
Reply {keyword} for {label}.
The recipient sends the keyword back as a regular reply on the same channel — no link or app required. Responses are attributed by sender phone number or WhatsApp ID. Any reply that doesn't match a configured keyword is treated as Not responded.
Example (SMS with a custom poll):
This is a incidents sms test.

Reply Yes for Acknowledge.
Reply No for Need Help.
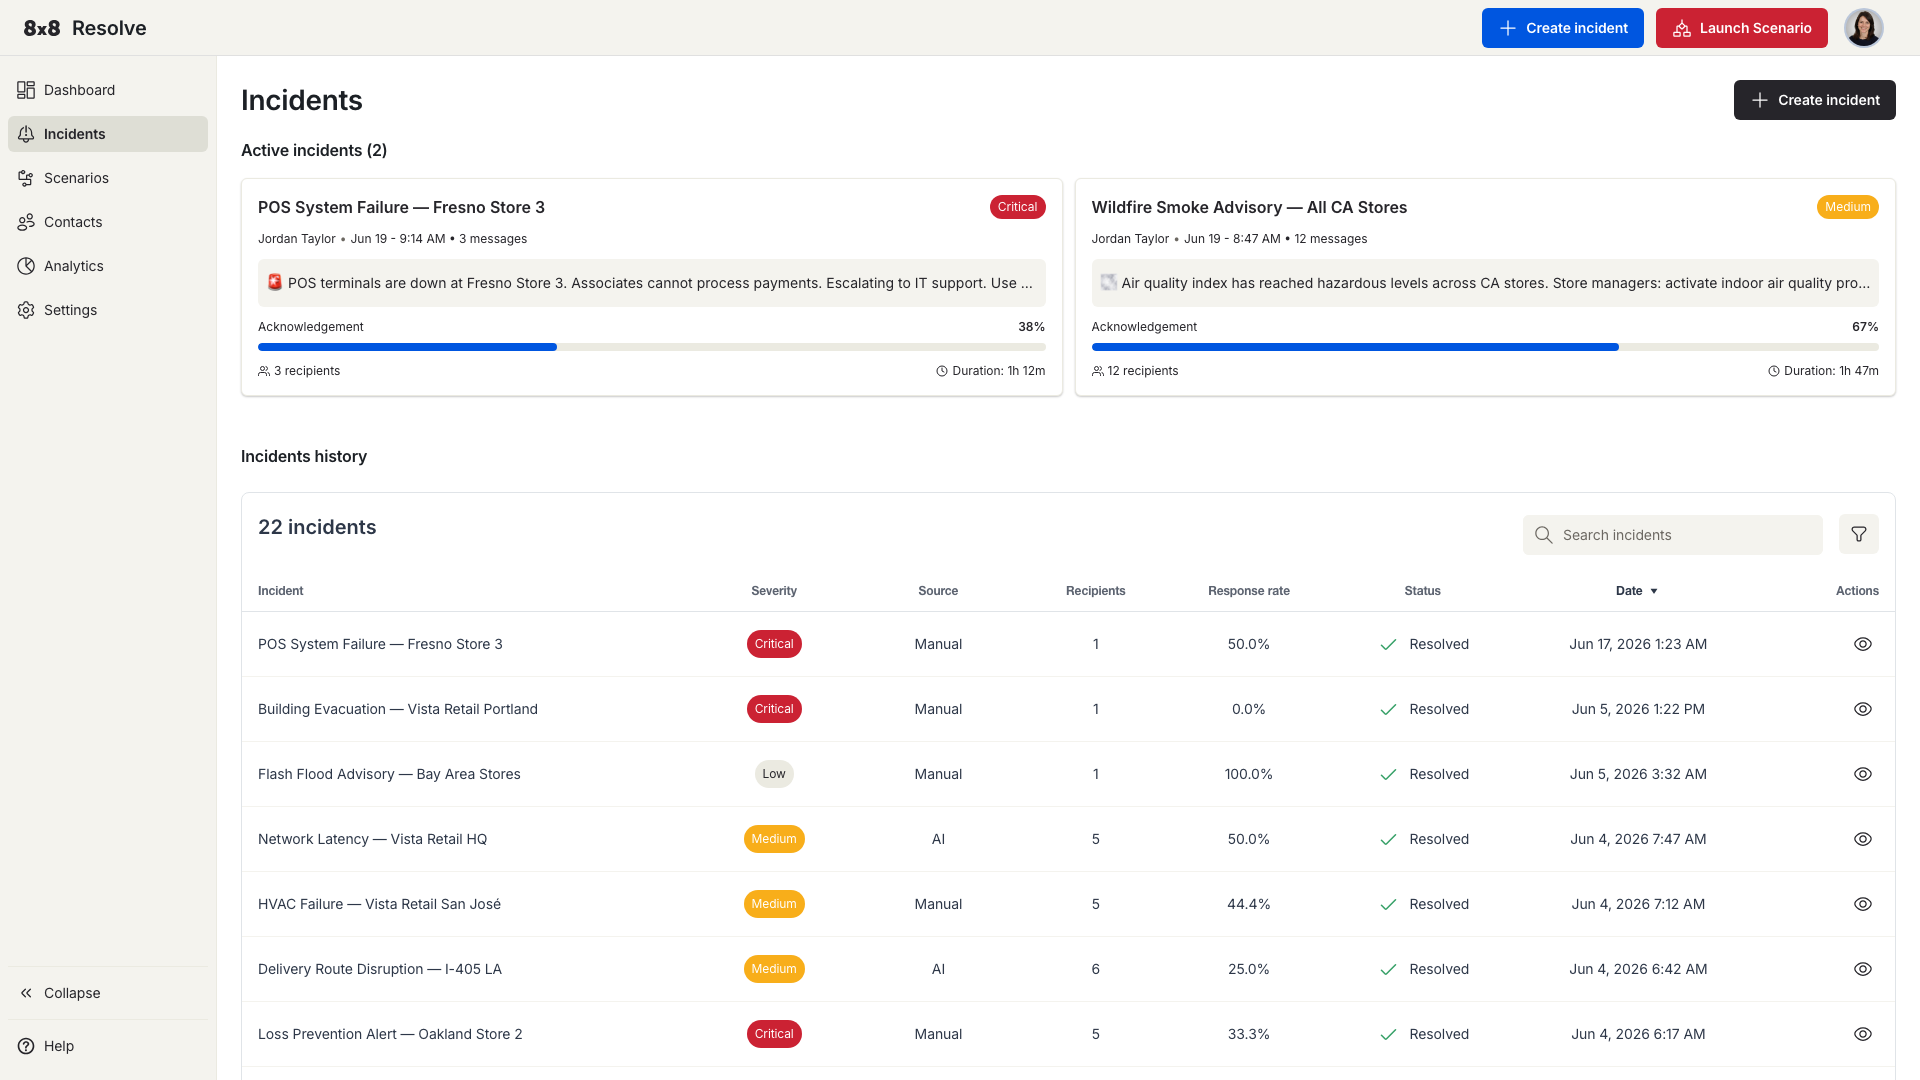
Incidents page
Navigate to Incidents from the left menu to see all your past and active incidents.
Active incident cards
The top of the page shows a card for each incident that's still active. Each card shows the title, severity, message preview, acknowledgement percentage, recipient count, and duration.
Incidents history table
Below the cards, the history table lists every incident with these columns:
| Column | Description |
|---|---|
| Incident | The incident title. |
| Severity | Critical or Medium. |
| Source | Manual (created by a user) or Automation (triggered by a scenario). |
| Recipients | Number of people targeted. |
| Ack rate | Percentage of recipients who acknowledged. |
| Status | Active or Resolved. |
| Date | When the incident was created. |
| Actions | Open the incident details. |
Search, filter, and sort
- Search — Type a keyword to filter the table instantly.
- Date range — Show only incidents from a selected period.
- Severity — Filter by Critical or Medium.
- Source — Filter by Manual or Automation.
- Status — Filter by Active or Resolved.
Combine as many filters as you need, then click Apply. To start fresh, click Reset — this clears all filters and restores the full list.
📘 Filter persistence
Your active filters stay in place when you open an incident and come back. You won't lose your filter state just by navigating away.
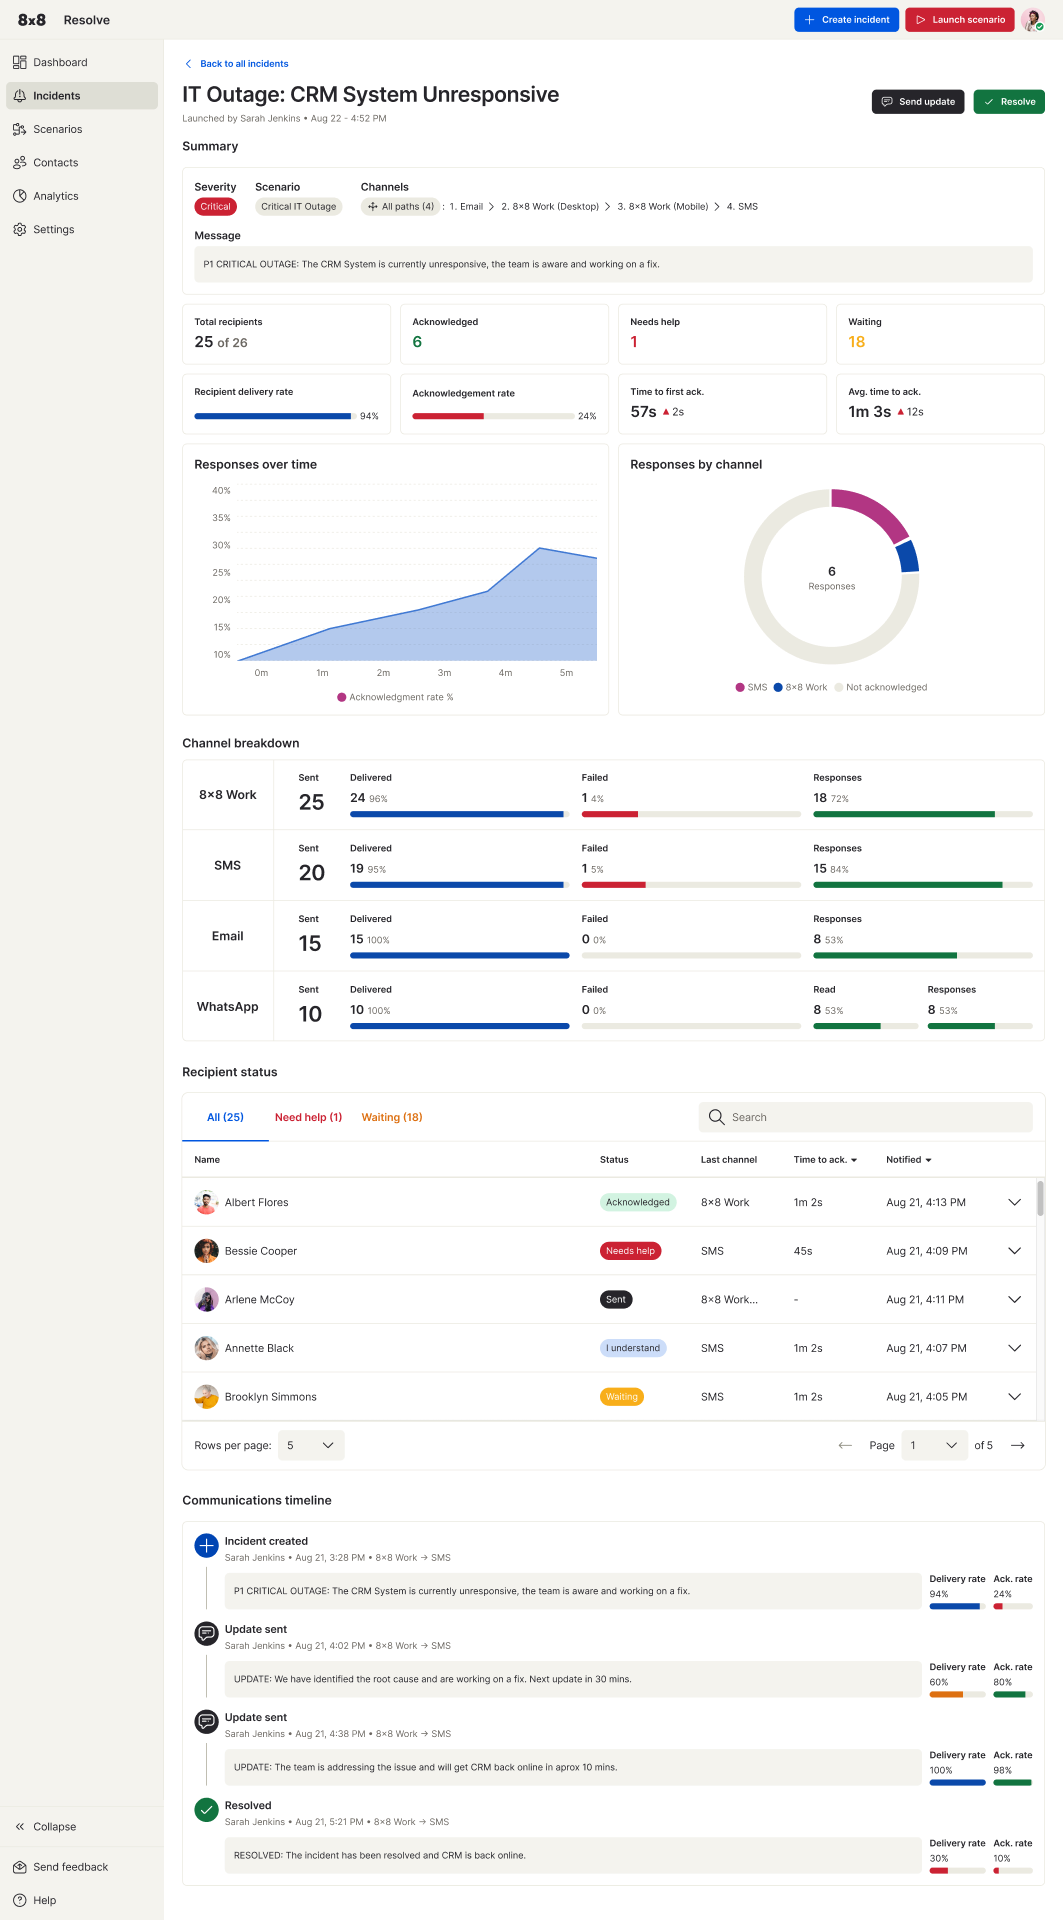
Resolve an incident
Open an incident and click Resolve. The status in the history table updates to Resolved straight away. The incident details page shows the full picture — delivery and response metrics, the recipient list, and a communications timeline of every update through to resolution.