Zendesk - Notifications Webhook
Learn how to send Zendesk notifications via SMS or Messaging Apps from 8x8
You can send SMS or Messaging Apps notifications automatically from Zendesk using Webhooks + Triggers. This guide outlines precisely how you can achieve this.
What you’ll build
Turn Zendesk into an auto-notify engine that keeps customers updated without agent busywork.
Business outcomes
- Fewer “any update?” tickets via proactive SMS/WhatsApp.
- Faster resolutions with clear, timely status pings.
- Consistent, compliant messaging using templates + placeholders.
- Low effort for agents (tag/macro triggers do the sending).
How it works
- Define the moments that matter (status change, public comment, or a “notify” tag).
- A Zendesk Trigger calls a Zendesk Webhook that posts to the 8x8 SMS or Messaging API endpoint.
- Zendesk renders the message template and 8x8 delivers it.
- A Zendesk Webhook that posts JSON to 8x8 CPaaS.
- A Trigger that calls the webhook when ticket conditions are met (e.g., status change, public comment, or tag added).
- A JSON payload that Zendesk renders with placeholders (like
{{ticket.id}}) before sending to 8x8.
Prerequisites
-
8x8 Connect
- Subaccount ID with SMS API enabled for SMS use along with registered Sender ID/Virtual Number for the destination countries you intend to send SMS to.
- Subaccount ID with a WhatsApp channel onboarded + pre-approved templates that you intend to use
- API Key
-
Zendesk
- Admin access to Admin Center (to create Webhooks and Triggers).
- Optional: Help Center enabled if you plan to use
{{ticket.link}}for end-user links.
Choose the correct 8x8 endpoint
8x8 provides region-specific base URLs. If your tenant is bound to a region, use that region’s host. When in doubt, start with the global host and consult your 8x8 representative.
| Channel | Base URL (regional) | Send endpoint (append to base) |
|---|---|---|
| SMS | https://sms.8x8.com | /api/v1/subaccounts/{subAccountId}/messages |
| Messaging | https://chatapps.8x8.com | /api/v1/subaccounts/{subAccountId}/messages |
Examples (final URL):
SMS:
https://sms.8x8.com/api/v1/subaccounts/{subAccountId}/messagesMessaging:
https://chatapps.8x8.com/api/v1/subaccounts/{subAccountId}/messages📘 Ensure your endpoint base url is accurate
Platform Deployment Regions: /connect/docs/platform-deployment-regions
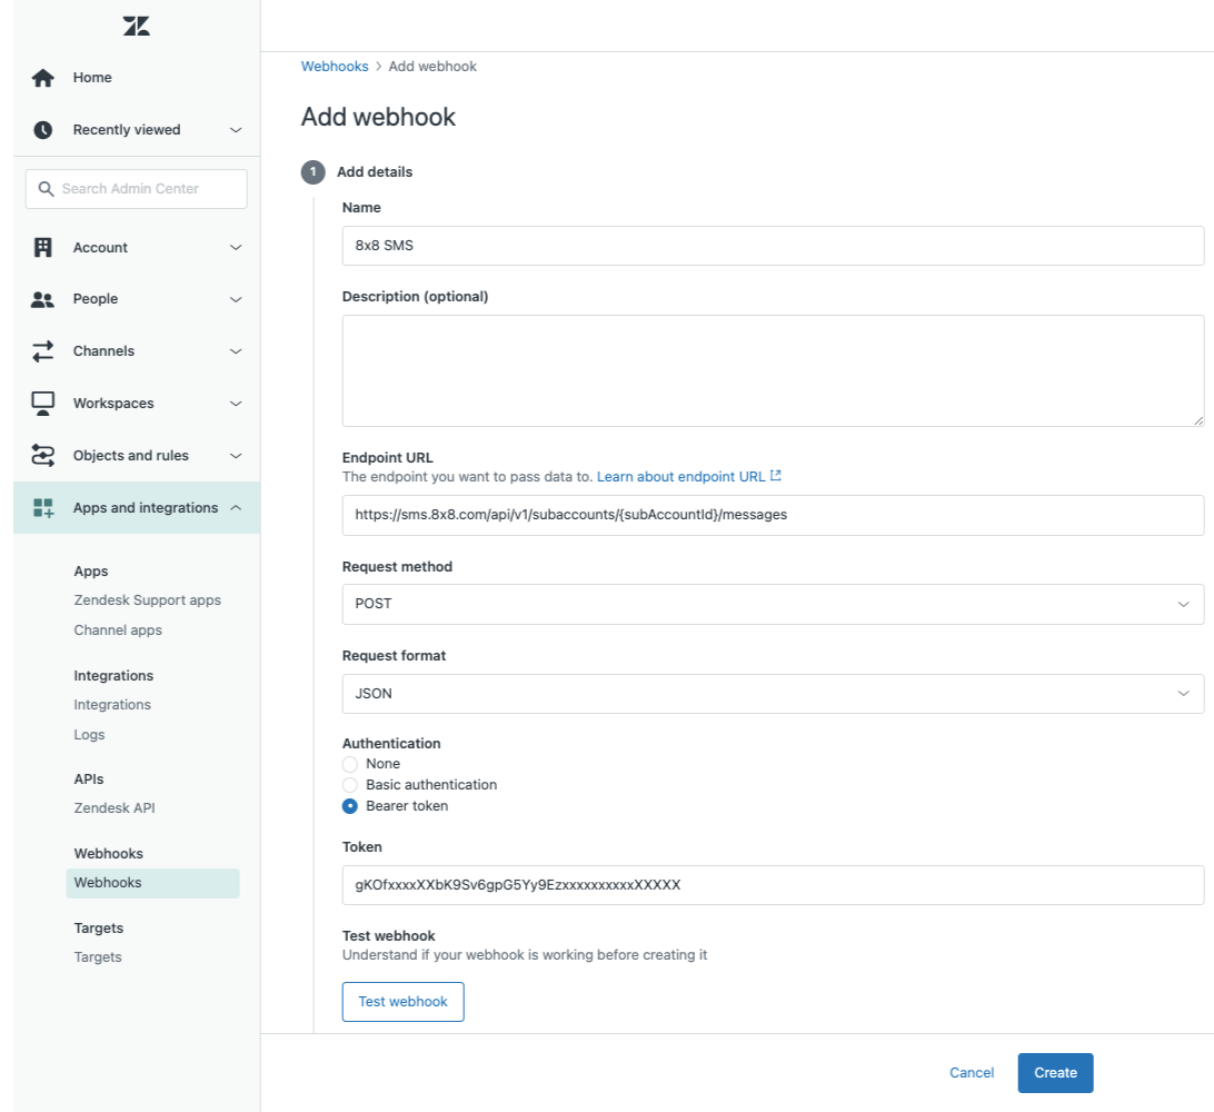
Step 1: Create the Zendesk Webhook
Create one webhook per channel (one for SMS, one for WhatsApp).
- In Zendesk Admin Center → Apps and integrations → Webhooks → Create webhook.
- Name:
8x8 SMS Send(and/or8x8 WhatsApp Send). - Endpoint URL:
- SMS:
https://sms.8x8.com/api/v1/subaccounts/{subAccountId}/messages - WhatsApp:
https://chatapps.8x8.com/api/v1/subaccounts/{subAccountId}/messages
- SMS:
- Request method:
POST - Request format:
JSON - Authentication: choose Bearer token and paste your 8x8 API key (Zendesk will send
Authorization: Bearer <token>). - (Optional) Custom headers:
Accept: application/json
(Zendesk setsContent-Type: application/jsonautomatically for JSON format.)
- Click Create (and you may Test with a sample body later).
Repeat for the WhatsApp webhook, and ensure you replace the subAccountId placeholder with actual values.
Step 2: Create a Trigger that calls the webhook
- In Zendesk Admin Center → Objects and rules → Business rules → Triggers → Add trigger.
- Name: e.g.
Notify via SMS when ticket is solvedorNotify via WhatsApp on public comment. - Conditions (example – adjust to taste):
- ALL:
- Ticket | Is |
Updated - Comment | Is |
Public - (Optional) Requester | Phone number |
Present(for SMS)
- Ticket | Is |
- ALL:
- Actions:
- Notify active webhook → Select your 8x8 webhook.
- JSON body → paste one of the payloads below (SMS or WhatsApp).
Zendesk will render placeholders (like
{{ticket.id}}) before sending, so 8x8 receives concrete values.
Payloads
Option A: SMS (8x8 SMS API)
Use when you want a plain text SMS to the ticket requester’s phone.
Webhook: 8x8 SMS Send
JSON body:
{
  "source": "<Your Approved Sender ID or Number>",
  "destination": "{{ticket.requester.phone}}",
  "text": "Update for ticket #{{ticket.id}} ({{ticket.status}}). View: {{ticket.link}}"
}
Notes
source: use an approved sender ID/number for the destination country. If country rules prevent alphanumeric sender IDs, use a numeric source.destination: prefer international format (e.g.,+12025550123). If you store national format in Zendesk, ensure your 8x8 route/country settings are configured accordingly.- Keep messages concise to avoid multi-part SMS billing.
Option B: WhatsApp (8x8 Messaging API)
Use when you want to send a WhatsApp message (template, or freeform within the customer service window).
Webhook: 8x8 WhatsApp Send
JSON body : Example template message with a single text parameter
(Replace <Template Name> and set the language, e.g., en_GB and any other content you may have). Refer to this page for other sample JSON body for template messages. Ensure the JSON body is as per the approved template.
{
  "user": {
    "msisdn": "{{ticket.requester.phone}}"
  },
  "type": "template",
  "content": {
    "template": {
      "language": "en_GB",
      "name": "<Template Name>",
      "components": [
        {
          "type": "body",
          "parameters": [
            {
              "type": "text",
              "text": "{{ticket.id}}"
            }
          ]
        }
      ]
    }
  }
}
Alternate freeform (inside WhatsApp’s customer service window)
{
  "user": {
    "msisdn": "{{ticket.requester.phone}}"
  },
  "type": "text",
  "content": {
    "text": "We updated your ticket #{{ticket.id}} ({{ticket.status}}). View: {{ticket.link}}"
  }
}
Notes
- Templates are required outside the WhatsApp customer service window. Ensure your WhatsApp templates are approved.
msisdn: use the customer’s phone number in international format.- You can enrich templates (images, documents, CTA buttons) by adding header/body/button components as per the Messaging API capabilities. Learn more here.
Testing
- In Webhooks, open your webhook and use Test webhook with a sample payload (hardcode a test number).
- In Triggers, temporarily loosen conditions so it’s easy to fire the trigger, then revert.
- Check Webhook Activity in Zendesk if calls are failing.
- Check 8x8 API response codes in the webhook logs (2xx = success). If you enabled 8x8 delivery callbacks/logs, verify downstream delivery there.
Troubleshooting
- 401/403 from 8x8: wrong/missing API key or subaccount; ensure the webhook auth uses Bearer token and the endpoint URL has the correct subaccountId.
- 400 from 8x8: invalid phone format, missing required field (e.g.,
textfor SMS, or template name for WhatsApp template). Validate your JSON and field names exactly. - No phone on requester: add a trigger condition such as Requester → Phone number → Present or add a fallback (e.g., email) via a separate trigger.
{{ticket.link}}doesn’t render: Help Center may be disabled. Use a different placeholder or craft your own URL pattern if needed.- WhatsApp message rejected: using freeform outside the service window, or the template is unapproved / mis-named / wrong language. Switch to a valid template and resend.
FAQ
Do I need two webhooks?
Yes. Create one for SMS and one for WhatsApp. Point your triggers to the right one.
Which placeholders are safe?
Conservative defaults: {{ticket.id}}, {{ticket.status}}, {{ticket.requester.name}}, {{ticket.requester.phone}}, {{ticket.assignee.name}}, {{ticket.link}}. If a field is blank in Zendesk, the rendered value will be blank.
Appendix: Example end-to-end flows
A. Notify by SMS when ticket is solved
- Trigger conditions: Ticket → Status → Changed to →
Solved - Action: Notify active webhook →
8x8 SMS Send - Body: use the SMS payload above
B. Notify by WhatsApp when a public comment is added
- Trigger conditions: Ticket → Is →
Updated; Comment → Is →Public - Action: Notify active webhook →
8x8 WhatsApp Send - Body: use the WhatsApp template payload above
C. Notify when a specific tag is added (fires once)
Use this when you want Zendesk to notify via 8x8 the first time a tag appears on a ticket (e.g., notify_customer_sms or notify_customer_wa).
We’ll guard against re-firing by adding a sent tag after we send.
Example tags
- Business tag you add to a ticket (manually or via another rule):
notify_customer_sms - Sent tag that this trigger will add after notification is sent:
notify_customer_sms__sent
Trigger conditions
-
ALL
- Ticket | Is |
Updated - Tags | Contains at least one of the following |
notify_customer_sms - Tags | Contains none of the following |
notify_customer_sms__sent - (Optional) Requester | Phone number |
Present← prevents attempts without a number
- Ticket | Is |
Trigger actions
-
Notify active webhook → select your 8x8 SMS Send webhook
JSON body (SMS example):{
"source": "<Your Approved Sender ID or Number>",
"destination": "{{ticket.requester.phone}}",
"text": "Update for ticket #{{ticket.id}} ({{ticket.status}}). View: {{ticket.link}}"
}(If you are using WhatsApp, select your 8x8 WhatsApp Send webhook and use the WhatsApp payload from Option B.)
-
Add tags →
notify_customer_sms__sent
(ensures this trigger won’t fire again for the same ticket/tag) -
(Optional) Remove tags →
notify_customer_sms
(use this if you want the “business tag” cleared after the notification is sent)
Notes
- To run WhatsApp on tag instead, replace the business tag names accordingly (e.g.,
notify_customer_wa/notify_customer_wa__sent) and use the WhatsApp template payload - If you have the need to send the same notification to your users multiple times across a long lifecycle, omit the sent tag/condition or use versioned sent tags (e.g.,
notify_customer_sms__sent_v2), then update the trigger conditions accordingly.